• Hi Guest. Welcome to the new forums. All of your posts and personal messages have been migrated. Attachments (i.e. images) and The (Old) Classifieds have been wiped.

    The old forums will be available for a couple of weeks should you wish to grab old images or classifieds listings content. Go Here

    If you have any issues please post about them in the Forum Feedback thread: Go Here

Nothing but problems with my Custom G&P M4

There's every possibility that the wiring that may be damaged is around the bottom end of the gearbox where the motor comes in. It's a pretty standard place for it to get mashed by gears or nipped between the halves of the gearbox casing. Without taking it apart you'll never know.
It's almost like I know what I'm talking about.... ?

 
It's almost like I know what I'm talking about....
:lol: :lol: :lol:

Ahhh Lozart...I've been expecting you.

Was wondering when you would "turn" up. Just like the motor that turned into my wires.

How hard can it be ????
That was exactly what I said before I first opened up a gearbox.

I had to change a spring.

Just a spring.

That was all.

Knocked my gearbox over and emptied all of its contents

2 and a half hours later " WHY DO THESE SPRINGS KEEP ******* POPPING OFF YOU ****** * * * * ***** ** "

3 hours later "WHY WONT YOU CLOSE YOU ******** POXY SHELL"

Shortly after I finally got it back together ..."I've stripped the motor screw, you cheaply made, pot metal SON OF A...."

3 days later "What the **** is this?????!?"

They sent me the wrong package

Couldn't be bothered to send it back and to this day it sits under my bed known as the shitbox

First airsoft gun I ever bought....it was the lowest grade combat machine and it lost a load of fps after heavy use and of course I didn't know anything about o-rings and seals because I never looked into the teching side of airsoft so I just threw a new spring in it thinking that was the answer.

On a 9.6v battery, that thing would get like 8rps I sh*t you not. I know now that it was dodgy. I had friends that had similar combat machines that they bought off of different websites and none of them were as bad as mine.

 
Last edited by a moderator:
Results from the gearbox opening:

1) The compression was perfect already which surprised me quite a lot. Nevertheless, I put in the new cylinder and new spring.

2) The gearbox itself was relatively clean and only the motor entry point was dirty from the wire debris

3) The shimming job is lazy. Now I don't know if it really has been properly shimmed but from what I saw, there is two shims per gear (one shim each side of each gear).

No that could actually be all that was necessary but I feel like it's too good be true. Maybe a re-shim is necessary. I'll look up some guides

4) The re-wiring looks like it could be fairly straight forward and easy with thin wiring. Glue is a must. It looks like the tech put some wire insulation down one of the grooves for the wiring and glued it in place to keep it out of the way.

Nice way to do it in my opinion.

5) The trigger spring had snapped off on the long end..no biggie, threw a new one in and seemed to work just fine.

Difficulties from starting to open up gearboxes again:

1) HOLY **** THAT ANTI REVERSAL LATCH - When people say that the anti reversal latch is annoying...I really really know what they mean

Maybe I was doing it wrong but every time I put the spring on it and got it behind the bevel gear, it would pop back up again and shift out of place.

2) HOLY **** THAT SPRING - Getting that M120 back in there was hilarious. Brother was round with the wife and kids for the afternoon and he was holding the spring in whilst I put the shell back on.

He let go of the spring and the spring guide comes shooting off right into his hearty sack which was followed by a not so surprising "oww" and a comforting nap on the floor until the pain had gone.

3) SHIMS...SHIMS EVERYWHERE - The illusive "where did that one go again" was a common feature for the day

4) FAT BASTAD WIRING - That stuff is chunky. There is an area where it hasn't been fixed in by the rear and I had to squirm the wiring back inside for about ten minutes because it kept popping out. Should of just squashed it in there tbh...It's getting opened up the next day or a couple days after that anyway. Might create a weak point on the gearbox though because it was operational and I wanted to see if when I had it back together it could feed but the wiring was warped and so I couldn't connect the motor up for a test fire.

Unsolved Problems:

1) So the tappet plate spring has been shortened as far as I can tell. Problem is that it's incredibly hard to seat it on the sector delay chip as it wants to sit on top of it. When it would seat it, the tappet plate was almost touching the piston with the fin end bent up in the air looking like it was gonna snap. Something I did was definitely wrong here.

2) When I put it back together, the air nozzle was not at rest (I think). It looked like it was in the forward position and I thought that it usually stays in the position were the groove about half way down is sitting inside the gearbox.

3) I couldn't work out for the life of me how to orientate the gears correctly. Even after watching some videos, because of the short stroke, I didn't know if I should reset the sector gear to the 12 o'clock position with the piston so that

it would start from a corrected AOE position or that I should start it up from that where the first tooth on the sector gear used to be.

The wiring might arrive tomorrow hopefully but I've removed the previous wiring. I'm gonna leave the gate wires alone. They are a bit crushed in places but its really not the bad, nothing a bit of electrical tape won't fix.

A very big thing that I've thought about recently and probably am gonna need is an external battery pack on my stock.

It's a crane stock and the wiring is getting crushed every time I push the stock all the way down because that's where I have it. This is gonna become a recurring thing if I don't stop the crushing in the first place so I figured running all the wires out the back of the receiver and into a pouch on the stock. Don't know if there is a better way to do it tbh. Could drill a hole out of the side of the stock and run an extension from the mosfet to the battery.

 
Last edited by a moderator:
1) HOLY **** THAT ANTI REVERSAL LATCH - When people say that the anti reversal latch is annoying...I really really know what they mean

Maybe I was doing it wrong but every time I put the spring on it and got it behind the bevel gear, it would pop back up again and shift out of place.
http://www.ebay.co.uk/itm/like/290728987068?lpid=122&chn=ps&adgroupid=27378760866&rlsatarget=pla-181484353506&adtype=pla&poi=&googleloc=9045871&device=c&campaignid=620865095&crdt=0

Massive thanks to Samurai for this excellent tip - 1 or 2 1mm x 10mm under AR keeps it in place

(don't work on trigger but an old bit of metal/feeler gauge or something bent into a U shape will work if needed - not often but if trigger wants to jump out then use the clip)

2) HOLY **** THAT SPRING - Getting that M120 back in there was hilarious. Brother was round with the wife and kids for the afternoon and he was holding the spring in whilst I put the shell back on.

He let go of the spring and the spring guide comes shooting off right into his hearty sack which was followed by a not so surprising "oww" and a comforting nap on the floor until the pain had gone.
Well if you had a m130 it was a worn/chopped/mislabelled one - old springs can fade

easy springs are like 150mm in length normal springs are 175-180mm in length

length doesn't mean everything - keep telling missus that...

but shorter springs are easier to install as you hardly have to compress them - yet they can still be powerful

spring guides differ too - some have a hole right the way through them and a thin long screwdriver can pass through some guides and actually hold/steady the piston in cylinder, keeping it down and on the rails

some spring guides don't let you pass a thin driver/rod through so makes it more difficult installing higher springs

the port on cylinder helps if aligned with piston's rails - blah blah blah

3) SHIMS...SHIMS EVERYWHERE - The illusive "where did that one go again" was a common feature for the day
metal digital caliper gauge - comes in very handy in case you get near perfection - then measure shims on each gear above/below

if you experiment taking up a little excess slack or relocating/adjusting the gear spacing and balls it up or worse it all goes flying and you think F*CK

At least you got something to come back to - so it isn't a stupid thing to check & note the shimming - just in case the worst happens

4) FAT BASTAD WIRING - That stuff is chunky. There is an area where it hasn't been fixed in by the rear and I had to squirm the wiring back inside for about ten minutes because it kept popping out. Should of just squashed it in there tbh...It's getting opened up the next day or a couple days after that anyway. Might create a weak point on the gearbox though because it was operational and I wanted to see if when I had it back together it could feed but the wiring was warped and so I couldn't connect the motor up for a test fire.
Yup that Silicone is bloody wedged in there so to run both wires out the rear of box requires quite a bit of work

the grip with 2 thick wires at back - most grips don't let you do this without some modding - or quite a bit of modding

thinner wire will be easier - don't hurt to chuck a few tiny loops of shrink around a pair of motor wires

plus the bin/sandwich bag twist to keep two wires together at bottom of box in the mofo wire build I did

 
Crap - I don't believe I just lost about 25 mins of crap.....

place this under AR latch - kudos to samurai:

http://www.ebay.co.uk/itm/like/290728987068?lpid=122&chn=ps&adgroupid=27378760866&rlsatarget=pla-181484353506&adtype=pla&poi=&googleloc=9045871&device=c&campaignid=620865095&crdt=0

2 of them will hold AR in place from underneath

pic just to show the orientation of gears, tappet plate delayer - not my pic and AoE isn't corrected

just to give you idea of gears - tappet etc....

CA_M15A4_CQB_Gearbox.jpg


wires should just feed through into a groove/channel in receiver/stock tube etc.....

some stock tubes are more friendly than others - this one is very friendly the slits help to shift wires to one side to fit battery/Gate

the way the stock tube has the silver retainer that can slide out/in means you can have fat deans and feed all the wire through without any trouble

Element%20Extend%20Type%20Battery%20Stock%20TUbe%20for%20M4%20%20M16%20AEG.jpg


again it isn't end of the world - there are options will all builds - all down to taking time/planning etc....

or if you got a nice tube that fits snuggly and all that go nuts with a dremmel:

egrHDyE.jpg


yeah not the perfectly neatest of jobs and a few slips of dremel plus a few discs on that but did the trick that I wanted it to

then the Gate can be fitted/removed or wiring pulled to one side when tighten/loosen/removing stock tube much easily

normally I just say to hell with it and fit a stubby M4 stock on shorter guns or maybe a full fixed stock on longer guns

but no adjustment on fixed stocks so like most stuff there is always a trade off when you select stuff on your gun

I typed more crap in a bit more detail but it screwed up and lost another war n peace masterpiece

but there are some more pointers or stuff to consider

don't think you will need to go nutz though like I did using the silver wire - the messing about I did was only coz of fatty mofo wire

which considering it was such a ballache again & again it didn't offer that much performance for all that grinding

(the gearbox was absolutely mullered on the other side/half too)

 
Last edited by a moderator:
DAMN you got that MOSFET locked down :D

That makes a lot more sense because I was positioning the gears already picked up by the piston which was causing me all kinds of hell.

Have you ever thought about putting the motor underneath the ARL area to hold it? I just thought of it but it might pull things into all kinds of strange areas. Worth a go.

The way that you've positioned that MOSFET in the stock is probably what I'll try tomorrow if that silver wire turns up. Some shrink wrap and duct tape looks like it helps out a lot with the whole crunching fiasco.

Save on a bag on my stock and loose wires.

My buffer tube has those slits in the sides for routing wires so maybe installing the MOSFET a bit better than it is now will be much easier than I thought.

Should I shave a couple mm off of the front of the tappet plate to improve air seal to the hop up? I feel that the air leak might be in that area if it isn't in the gearbox. Don't want to do it if unnecessary though so maybe I should see how this goes first before I wack out the sandpaper.

Maybe there is no air leak and the cylinder volume is what's causing the fps loss?

Maybe the Nuprol springs are actually rated a lot lower/ are sh*t? (Wouldn't surprise me)

Maybe the air leak is in the hop up? (That would really surprise me with the o-rings and such)

Only one way to find out... "FIGGHTTT!!"

Or....you know...testing n stuff...I guess :D

 
Last edited by a moderator:
Should I shave a couple mm off of the front of the tappet plate to improve air seal to the hop up? I feel that the air leak might be in that area if it isn't in the gearbox. Don't want to do it if unnecessary though so maybe I should see how this goes first before I wack out the sandpaper.
Not all stuff is the same and is true with nigh on all stuff like tappet plates:

3PNASmh.jpg


also the shs tappet plate seems to have the ridge in the U slot sitting a little further back from center

so with shs tappet plate you can sand it down at least 0.25mm maybe a little more

just lay a sheet of emery/sand paper flat and standing the tappet plate upright sand it in a circular motion & reverse circular

or what ever way takes your fancy - just try to do it evenly

0.25mm sanded off front of tappet plate should push the nozzle that distance further forward to help seal better

you should feel resistance placing the hop to nozzle at its full extension

would suggest doing this on a fully assembled box and ensure nozzle fully forward:

maxresdefault.jpg


you should feel resistance of about 1mm to 1.5mm at that point of the nozzle pressing to seal against bucking lips

you want some resistance to seal without blowing out in operation

but not too much that it knackers the bucking lips quickly

if gearbox seals piston/cylinder ok, the nozzle seems to seal against bucking

then unless nozzle is damaged or something daft....

Any air loss will likely to be in bucking/hop or badly aligned gearbo/nozzle to hop unit that might rub/catch impede it in operation

google up ptfe hop unit mod - you can have air leaking out around hop C clip or end of hop barrel

hop/bucking air loss is another thing but that bridge can be crossed if needed a bit later after box is sorted

 
Last edited by a moderator:
Shimming as we speak using the bevel to pinion method. Getting a lot more comfortable with gearboxes and shimming is more time consuming than I thought but with a

bit of practice I can see how one could speed up the process significantly. The shimming before hand was lazy as I thought previously. Very loose but it's quite a ton

better atm.

No play when I shift the bearings either side and gears spin freely.

Did each gear with the gearbox screwed up and found that doing it whilst pressing down on it and actually doing it up can have massive differences in tightness.

I'm actually shimming bevel to pinion right now. When I go to wiggle the bevel gear though with the motor in, there is absolutely no play from what I can tell which

I'm thinking is probably too tight but I'll have a look at the guides. The G&P Gearbox isn't exactly work friendly as there is an absence of holes around the bevel so when I

have the motor in and the gearbox done up, it's hard to tell how much play the bevel actually has.

Really surprised with the shim job I was given though. It was rather...well...crap.

I have an SHS tappet plate so I'll shave a touch off and do it like you said.

Is there anything bad about shaving too much off of the tappet plate or can I go up to the ridge?

Will I eventually shave so much off that the air nozzle starts slamming against the hop up and break?

Or weaken the tappet plate too much maybe?

 
The bevel is in fact the one gear that you can have a bit more play side to side

the pinion is inserted so there is no way it will slop about when you think about it

the pinion is going to keep it there so as long as it is skimmed to correct height it can have a little more give underneath the bevel gear

Yes you are correct - you get it all shimmed with just a small smidge of play then when you tighten it up it is shimmed tight coz it all disappeared

With practice you get to suss out you have say 0.20mm when clamping the box by hand

this halves to a nice 0.1mm when all tightened up which is what you want

Bevel can have a little bit more play especially if pistol grip is a bit snug - but it ain't going nowhere with pinion gear holding it in place

Just as long as motor height is nice and not too high/low or forcing the bevel out of the gearbox drawing loads of amps and everything running red hot etc....

Have a look at Rogers - shut up gears - jeez that is the shimming guru mofo - but c'mon think that is a little too involved

but it explains the fine details of it - you don't have to go that mad but think most people's will shimming will improve after watching that & a some other good guides - bloody good of people to share their wisdom like that

TBH - you want bushings or mainly bushings on a high speed build

At the very least you should have 1 bushing underneath the middle spur gear - honest

that is THE point that is bombarded with stress from motor & spring and that one alone will fail first - even ceramic bearings can fail there

So if you splash out £30 on ceramics - still fit a bushing under spur

Yes it is wise to glue them in - especially if loose fitting bearing/bushings superglue or epoxy

But 8mm bearings is going to better than 7mm & 6mm especially won't last - I had a build wreck itself after 15k

the 7mm bearings were stock and thought they would be alright - developed a LOT of wear & were all over the place until it smashed all teeth off bevel

(luckily most bevels are 10 teeth so it could be redone with 7mm bushings and the old bevel from the std gear set was fitted into a 13:1 set)

Everyone will do stuff differently - guess you could use bushings underneath the gears and maybe bearings on top

but deffo that one under the spur is where most stress all meets up

Shimming - again you can never guess it especially the bevel height

spur has a thin one underneath it (0.1 to 0.2) & whatever is required to space it just right

sector has roughly half & half what is needed on both sides aprox - checking there is a slight gap where spur/sector lay

bevel - well I won't say can be ANYTHING on top 0.1mm to 0.55mm on one crazy slack v3 box I built - all gears had loads of shimming splace on that box with 6mm bushings and if using bearings/bushings that can make a difference as bearings tend to lay lower than some bushings - in fact not uncommon to reduce the bushings a bit by sanding them on emery - shs 8mm solid bushings are sometimes too thick and care is needed to ensure a low spur gear's teeth isn't rubbing on bevel/sector's lower bushing - blah blah blah...........

There is no ultimate guide - everybody does stuff a bit differently - uses different stuff works to certain standards and still we keep learning/changing/trying different stuff as each build is slightly different or unique....

The tappet plate you will be fine with, if you are that worried - run a marker over it all at front to show you are filing/sanding it down evenly

though tbh I feel the emery paper sanding it with it vertically - just going in a clockwise & anti clockwise - ok counter clockwise motion as anti clockwise is incorrect term to some

Sanding it down will be fine - 2mm is very fine - was shocked to the SRC one

but 0.25mm down to 2.25mm will help and be fine

If that SHS blue is like most I've seen and your nozzle isn't superglued on (hot water helps to remove)

if you look at groove in the U you will see the ridge is set a little off center - say 40% back so you can shave off 10% off front 2.5mm down to 2.25mm

To be honest though I say 1.5mm max resistance when pushing hop to nozzle - you can have a bit more up to say 2mm

BUT this is due to the M4 having a sprung loaded hop pressing against the box

on AK's the hop is fixed and that is why I say 1.5mm limit to stop people smashing the lips to bits if no give on hop unit

The M4 isn't a set in stone rigid hop so you can go a little tiny bit more - not insane but you want the lips not to blow out but not smash them to bits

Shave that tappet plate - sand it is best - it won't take too much off too quickly

some guides use dremel sanding discs - that is a bit daft to me

file it yeah maybe then sand to finish but a power tool - no that is for Short Stroking & grinding stuff down like metal teeth on piston etc....

Get the nozzle's "groove" in center of " U " if you haven't got a digital caliper gauge - get a cheap metal one off fleabay if you do more work

 
The bevel is in fact the one gear that you can have a bit more play side to side
Literally just tearing my hair out trying to find the right combination for the top because it's either too tight or too loose. I had a setup with the tiniest amount of wobble and amazing "free-spin" but the bevel was wobbly slightly.

Yes you are correct - you get it all shimmed with just a small smidge of play then when you tighten it up it is shimmed tight coz it all disappeared
I figured that out the hard way when I looked at a 4 year old "How to shim" on youtube only to realise that the method he was using just doesn't work.

TBH - you want bushings or mainly bushings on a high speed build
I considered this at the very start of the build but some people on the forums were saying that bearings can last if you take care of them and then

others were saying that it is best to buy bushings because bearings will at some point fail. Knew I should of gone with the latter but I guess that's just another thing

to consider for the future builds

Have a look at Rogers - shut up gears - jeez that is the shimming guru mofo - but c'mon think that is a little too involved

if you look at groove in the U you will see the ridge is set a little off center - say 40% back so you can shave off 10% off front 2.5mm down to 2.25mm

Get the nozzle's "groove" in center of " U "
I used someone called "Stinger" on YouTube. He used the Bevel to Pinion and it seemed fairly alright but I'll definitely check out Rogers' Guide.

I'll sand it back after I'm done with the shimming which looks like not long. Holy shit I have a new appreciation for shimming and people that shim very well/ near perfection. This stuff is time consuming.

 
Shimming is time consuming - sometimes it can come together quite quickly

often though depending a bit of luck (swear this applies to numerous stuff in airsoft)

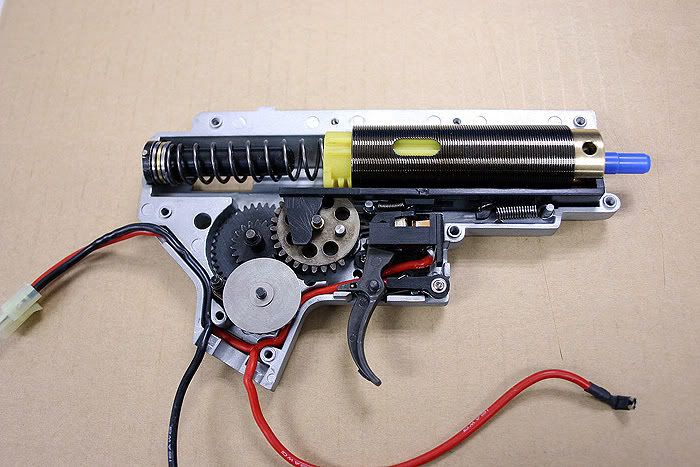
quality of gears/box/bushings/bearings - even shims - Element ones seem to be cut or punched quite roughly so you get slight deviations

not a lot but if you place a 0.20 shim in caliper gauge and rotate it a little you can feel the rough punched edges varying the shim

not a great massive amount but say it can show up 0.25mm on an Element shim where as a SHS may show 0.21 or 0.22 at very most

it isn't the deviation so much but it just feels rough as well and not finished so well like SHS ones

Also depends on your fussy standards too BUT a LOT depends on how well the shimming is done

Bad shimming, crap motor height puts strain & wear on motor wiring and drain battery quick draw excess amps too

The box/motor will crap out quicker - heck fuses blow on badly assembled builds very easily pistol grips get bloody hot

And above all it just sounds $hit

It is not always simple to get it purring so sweetly but hopefully we try to make them as best as possible without sounding like you are kicking a dying cat being stung by wasps whilst jangling a bag of rusty old bolts on the field

Bearings - they would be fine for most "normal" builds of say 20rps or just over I'd say

But most insane nutty builds at 40rps+ will use bushings

You are using a high speed set on 11.1v so you are likely to hitting say 35rps - so yeah bushings or at least a mixture is what I would use personally

I use a mixture at least - some boxes the bushings has stuck out a bit and used a bearing instead of bushing but underneath gears a bushing over a bearing

BUT to each their own - and again depends how you use it - if you hose people then yeah it won't last ages

but if sensible semi & some spamming now n then it will last longer maybe - but how long is a piece of string ????

All this opening/closing box stuff - when inserting the M3 bolts usually by hand at first,

turn the bolt counter clockwise first and eventually you will see the bolt rise & clonk a tiny bit as it finds the threads

then do up the bolts - this helps to reduce chance of wear or stripping threads

This is more important on plastic components as often video consoles & stuff can have their threads on plastic cases worn or stripped very easily if you just jam the screws in and tighten - unwind-clonk-tighten will prolong the threads

Also unless you are very very weak do not go for a clenched fist when doing up fine screws and threads

Seriously - you should only need a thumb and forefinger to tighten the screw/bolt up with a mild nip if you feel it might really need it

Do not use a clenched fist to tighten you will strip threads very easily and might as well run it down kiwk-fit-euro to tighten with air tools

When you have closed the box up for the final time without stripping the threads....

If the box was assembled with gears and no real tension on spring you should still be able to feel a bit of play in them

As said - sometimes when you "think" you got it all perfect it is no biggie to re-open it to say change spring or check seals

coz at this point you can check stuff - clean/regrease and also just double check the pinion height again on bevel gear in other half of box

Wouldn't be the first time I have found the pinion a tiny tiny bit lower than I was expecting and so swapped say a 0.20 shim on top to a 0.15mm shim, adjusted motor height a bit but felt a bit more confident the gears were meshing a bit better

Note I'm talking very small amounts of adjustments if it is far out then something is really out of whack

This is why often that little toy gun won't just take a few hours but more like a few days on & off if you really want to get it as close to perfect as possible

(and that is if you got all the parts to hand in good working order, not on your knees looking for that little bastid AR spring or something - damn it better order a new one)

When it all works and you are pleased as punch or nigh on delighted with all your own work and celebrate with a beer & a large:

fuck_yeah.gif


Last edited by a moderator:
Order ID: 871
Date Ordered: 21/08/2016

Your order has been updated to the following status:
Shipped

The comments for your order are:
-------------------------------------------------------------------------------------------------------------------------
Have shipped out just the spring and have refunded you £7.50

If you still need wire message me on FB in 2 weeks time I'll get you some at rock bottom price

All the best
Pete

Please reply to this email if you have any questions.

--------------------------------------------------------------------------------------------------------

:( Looks like that wiring won't get delivered tomorrow. Alternatives? I'll have a look around unless you have a backup for your backup haha

Finished shimming...bevel has very very slight play without pinion attached. Gears spin freely..all that good jazz.

It is not always simple to get it purring so sweetly but hopefully we try to make them as best as possible without sounding like you are kicking a dying cat being stung by wasps whilst jangling a bag of rusty old bolts on the field
That needs to be a velcro patch...A very long velcro patch. :D

I am getting worried about the screws stripping on the gearbox shell. I must have closed it and opened it around 25 times. :unsure:

I just do as you advised. The screws are of decent quality but they aren't invincible, that's for sure.

When this thing is working, I'll be running up walls and scaling rooftops (not literally, for legal purposes)

Hopefully it'll be at a point where I can take it to a MILSIM event because at the moment I wouldn't dream of it...well I mean it is kinda in pieces at the moment so....yeah :lol:

 
pm an addy ffs

I'll send ya some silver and some Alpha

you can use the silver as positive and Alpha as negative

or use either but I only bought 30m of Alpha in black

I'll grab a 30m of red one day soon

when boxes remain in bits too long that is when little bits go walkies

so pm me and I'll post ya some wire

 
I'm really surprised that you would stick your neck out for me like that and help me so much. I really appreciate it so thank you but I wish I saw this 15 minutes ago because in that 15 minutes I've just spent 16 pounds on some ASG Ultimate Silver plated wire (price including Next day delivery even though it won't be delivered until Wednesday) :lol: :lol: :lol: :lol:

http://www.patrolbase.co.uk/airsoft-switches-selectors-and-mosfets/asg-ultimate-silver-plated-wire.htm#.V7tgepgrIuU

I really appreciate you helping me out so much though, you have been beyond helpful and I can't thank you enough.

 
http://imgur.com/a/pFbGv

Just a couple of pics.

First showing the extent of the posi wire damage

Second showing orientation of the gears I was trying to pull off when putting it back together (without the spring on).

 
ahh well no worries

could of gone to fleabay:

http://www.ebay.co.uk/itm/AIRSOFT-MOTOR-WIRE-BATTERY-CLIPS-CONNECTOR-TAMIYA-DEANS-HEAT-MALE-FEMALE-T-SET-/272009124279?hash=item3f5501d9b7:g:eBoAAOSwx~JWFWSd

http://www.ebay.co.uk/itm/Ultimate-Airsoft-Silver-Plated-Wire-2-Meters-16640-/351790069738?hash=item51e85277ea:g:zgUAAOSwPpFXMHmn

yup - think many of us have had a cable chew up around motor

some pinions/motors seem to catch more than others

a very fast motor I had was a bit tight to get into a shell's entry point than other stock or shs ones

you see jack squat didley - maybe a slight bit of resistance as you refit motor - bit of wiggle/push and if it shreds you are too late

so we all learn by our many many mistakes or mishaps

 
Okay so I've wired the new motor connectors.

This asg wiring isn't very bendy...kind of spring witha weird stiffness too it.

I want to wire it to an external pack and keep the crane stock.

Im thinking of wiring it with the mosfet through the stock and out through a hole in the side using a deans extension where I would my plug in my battery from.

Thoughts?

 
you got a split stock tube

get gun working once again - the wiring can be tidied up later

You could wire it to half of tube, plug in gate

then if needed add a smaller couple of inches of silicone deans wire at back so it flexes when fitting batteries

yes it is more connections/links so adds a bit more resistance

but real nutters hardwire thick wires with only one deans from gun to battery - soldering in just the mosfet on neg with a signal wire

but is a bitch to remove in stock tubes

So there is always a trade off unless to go for stuff like fixed stocks

main thing is getting gun running - wires well you can look at various options and tidy/trim up the wiring later once she is all working sweet

 
https://vid.me/fdTJ

SHE IS DONE. FINALLY HOLY MOTHER OF JESUS.

Lonex springs are long as my :P

But really, they take some force getting in there and I lost some faithful shims along the way. Rest in Peace.

The wiring wasn't all that hard but I will say that in now way is it the cleanest job. I didn't have a clamp and had to improvise.

It works...it's secure...I'm happy. Don't know how it feeds. Gonna test fire it now.

Thank you for your help in sorting out the bastarding gearbox

Edit: Another video including semi. https://vid.me/S8U4

 
Last edited by a moderator:
And just like that....problem number one rises.

Okay so when firing, it:

A: Jams

B: Makes a weird soft thump noise

C: Fires very slowly

My guesses....

Prowin Hopup with the Lonex Air Nozzle aren't a good combo

Prowin Hopup with G&P Body isn't a good combo

The new cylinder is undervolumed. I doubt it because it shouldn't jam because of this...well I would think.

I shaved off too much when sanding the tappet plate....I doubt this very much because I didn't sand off that much. It was equidistant on each side of the air nozzle groove

I'm going to throw the G&P Hop Up Unit in there and see what happens

 
Back
Top